使用 Java Springboot 开发 Restful API 接口 - 2021版
都2021年了,对初学Java的同学来说,起点要高,高度要够。
I、首先,我们看看开发配置环境:
- IDE: 我们使用VSCode
- Java SDK 1.8+
检查是否安装Java 1.8: java -version
下载 Spring Boot CLI,解压到目录,把目录命令行路径加入Path,检测是否安装成功:spring --version
- 安装Maven 3+ 或者 Gradle 4+
- 下载 Maven 3.6.3,解压到目录,把目录命令行路径加入Path,检测是否安装成功:mvn --version
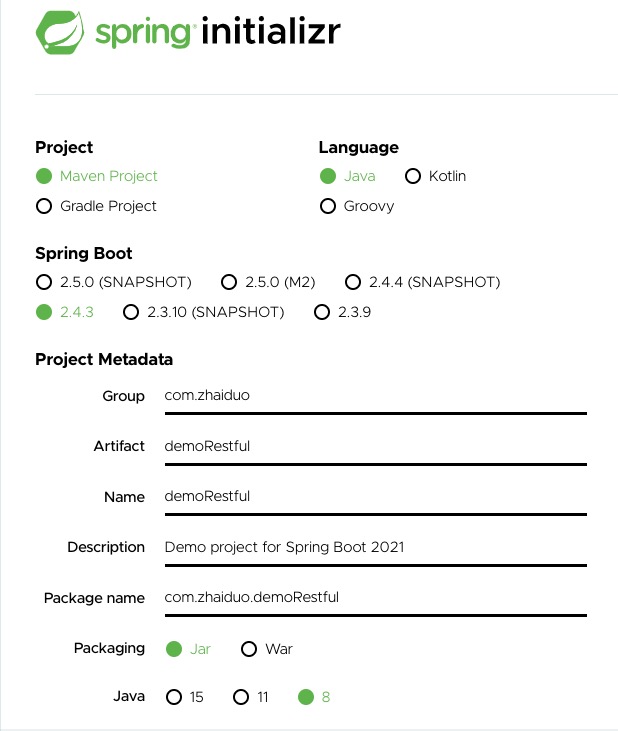
II、其次,脚手架生成项目,我们需要去 https://start.spring.io/ 下载一个初始化项目:

选择依赖:
- Spring Web - 包含Spring MVC框架和内嵌Tomcat服务器
- Spring Data JPA - 数据持久化接口
- Spring Boot DevTools - 开发工具
- MySQL Driver - JDBC 驱动器
点击Generate生成按钮,生成初始化项目 demoRestful.zip, 解压。
III、或者手动生成项目,新建目录firstDemo
- 新建pom.xml,并且当前目录下运行:mvn package
1<?xml version="1.0" encoding="UTF-8"?>
2<project xmlns="http://maven.apache.org/POM/4.0.0" xmlns:xsi="http://www.w3.org/2001/XMLSchema-instance"
3    xsi:schemaLocation="http://maven.apache.org/POM/4.0.0 https://maven.apache.org/xsd/maven-4.0.0.xsd">
4    <modelVersion>4.0.0</modelVersion>
5
6    <groupId>com.example</groupId>
7    <artifactId>myproject</artifactId>
8    <version>0.0.1-SNAPSHOT</version>
9
10    <parent>
11        <groupId>org.springframework.boot</groupId>
12        <artifactId>spring-boot-starter-parent</artifactId>
13        <version>2.4.3</version>
14    </parent>
15
16    <description/>
17    <developers>
18        <developer/>
19    </developers>
20    <licenses>
21        <license/>
22    </licenses>
23    <scm>
24        <url/>
25    </scm>
26    <url/>
27
28    <!-- Additional lines to be added here... -->
29    <dependencies>
30        <dependency>
31            <groupId>org.springframework.boot</groupId>
32            <artifactId>spring-boot-starter-web</artifactId>
33        </dependency>
34    </dependencies>
35
36</project>- 查看依赖:mvn dependency:tree
- 新建目录 src/main/java ,在 java 目录下新建 Example.java
1import org.springframework.boot.*;
2import org.springframework.boot.autoconfigure.*;
3import org.springframework.web.bind.annotation.*;
4
5@RestController //表示要处理web请求
6@EnableAutoConfiguration //表示自动配置Spring
7public class Example {
8
9    @RequestMapping("/") //表示请求的url相对地址
10    String home() {
11        return "Hello World!";
12    }
13
14    //入口函数
15    public static void main(String[] args) {
16        SpringApplication.run(Example.class, args);
17    }
18
19}- 回到项目根目录 firstDemo,运行:mvn spring-boot:run (限制内存:export MAVEN_OPTS=-Xmx1024m)
1[INFO] Attaching agents: []
2
3  .   ____          _            __ _ _
4 /\\ / ___'_ __ _ _(_)_ __  __ _ \ \ \ \
5( ( )\___ | '_ | '_| | '_ \/ _` | \ \ \ \
6 \\/  ___)| |_)| | | | | || (_| |  ) ) ) )
7  '  |____| .__|_| |_|_| |_\__, | / / / /
8 =========|_|==============|___/=/_/_/_/
9 :: Spring Boot ::                (v2.4.3)
- 启动成功后即可在浏览器访问:http://localhost:8080/
1Hello World!发布代码(可执行 jar 文件)
- pom.xml 中 <dependencies > 后添加编译配置:
1<build>
2    <plugins>
3        <plugin>
4            <groupId>org.springframework.boot</groupId>
5            <artifactId>spring-boot-maven-plugin</artifactId>
6        </plugin>
7    </plugins>
8</build>
- 根目录 firstDemo,运行:mvn package,你会发现新生成了一个目录 target
- 根目录 firstDemo,启动jar包:java -jar target/myproject-0.0.1-SNAPSHOT.jar (支持远程调试:java -Xdebug -Xrunjdwp:server=y,transport=dt_socket,address=8000,suspend=n
-jar target/myproject-0.0.1-SNAPSHOT.jar) - 启动成功后即可在浏览器访问:http://localhost:8080/
1Hello World!RESTful 接口
- 进入之前解压的 demoRestful 目录, 编辑 application.properties文件,加入:
1spring.autoconfigure.exclude=org.springframework.boot.autoconfigure.jdbc.DataSourceAutoConfiguration- 回到项目根目录 demoRestful,运行:mvn spring-boot:run
1[INFO] Attaching agents: []
2
3  .   ____          _            __ _ _
4 /\\ / ___'_ __ _ _(_)_ __  __ _ \ \ \ \
5( ( )\___ | '_ | '_| | '_ \/ _` | \ \ \ \
6 \\/  ___)| |_)| | | | | || (_| |  ) ) ) )
7  '  |____| .__|_| |_|_| |_\__, | / / / /
8 =========|_|==============|___/=/_/_/_/
9 :: Spring Boot ::                (v2.4.3)
- 启动成功后即可在浏览器访问:http://localhost:8080/
1Whitelabel Error Page
2This application has no explicit mapping for /error, so you are seeing this as a fallback.
3
4Sat Feb 27 20:46:29 CST 2021
5There was an unexpected error (type=Not Found, status=404).
6No message available
- 回到项目根目录 demoRestful,添加Greeting.java和GreetingController.java:
1//Greeting.java
2package com.zhaiduo.demoRestful;
3
4public class Greeting {
5
6	private final long id;
7	private final String content;
8
9	public Greeting(long id, String content) {
10		this.id = id;
11		this.content = content;
12	}
13
14	public long getId() {
15		return id;
16	}
17
18	public String getContent() {
19		return content;
20	}
21}
22
1//GreetingController.java
2package com.zhaiduo.demoRestful;
3
4import java.util.concurrent.atomic.AtomicLong;
5
6import org.springframework.web.bind.annotation.GetMapping;
7import org.springframework.web.bind.annotation.RequestParam;
8import org.springframework.web.bind.annotation.RestController;
9
10@RestController
11public class GreetingController {
12
13	private static final String template = "Hello, %s!";
14	private final AtomicLong counter = new AtomicLong();
15
16	@GetMapping("/greeting")
17	public Greeting greeting(@RequestParam(value = "name", defaultValue = "World") String name) {
18		return new Greeting(counter.incrementAndGet(), String.format(template, name));
19	}
20}
21
- 启动成功后即可在浏览器访问:http://localhost:8080/greeting?name=$xxx
1{
2id: 3,
3content: "Hello, $xxx!"
4}
Springboot 快速测试代码
1@RestController
2class ThisWillActuallyRun {
3
4    @RequestMapping("/")
5    String home() {
6        "Hello World!"
7    }
8
9}
10//spring run installTest.groovy
11//localhost:8080
常见问题
- 运行 spring run installTest.groovy 报错:Failed to collect dependencies at org.springframework.boot
1再次运行即可- [ERROR] No plugin found for prefix 'spring-boot' in the current project
1确保命令运行的目录有pom.xml文件- DataSourceProperties$DataSourceBeanCreationException: Failed to determine a suitable driver class https://www.baeldung.com/spring-boot-failed-to-configure-data-source
参考网址:
- https://docs.spring.io/spring-boot/docs/current/reference/html/getting-started.html#getting-started-introducing-spring-boot
- https://docs.spring.io/spring-boot/docs/current/reference/html/using-spring-boot.html#using-boot
- https://spring.io/guides/gs/rest-service/
